import sympy as sp
from mechanicskit import la

a = 4                                                    # [m] Distance ED
b = 3                                                    # [m] Distance AE
F_B = 4000                                               # [N] Force magnitude at B
F_C = 200                                                # [N] Force magnitude at C

theta = sp.Symbol('theta', real=True)                    # [rad] Angle at B
R_Ax, R_Ay, R_Ex = sp.symbols('R_Ax R_Ay R_Ex', real=True)5.5 Equilibrium Examples
“Egli è scritto in lingua matematica, e i caratteri son triangoli, cerchi, ed altre figure geometriche, senza i quali mezi è impossibile a intenderne umanamente parola; senza questi è un aggirarsi vanamente per un oscuro laberinto.”
“This book is written in the mathematical language, and the symbols are triangles, circles, and other geometrical figures, without whose help it is impossible to comprehend a single word of it; without which one wanders in vain through a dark labyrinth.”
— Galileo Galilei, Il Saggiatore, 1623, translated by E. A. Burtt, 1925
Every example in this chapter starts on paper. We draw the body free of its surroundings, name the points where forces act, write down the position vectors between those points and the force vectors, and state the two equilibrium conditions, \(\sum \bm F = \bm 0\) and \(\sum \bm M = \bm 0\), about a chosen point. Only when that hand work is done do we turn to Python. The code that follows each free body diagram is a transcription of the paper: the same vectors, the same two equations, solved for the unknowns. What the transcription buys us is that a parameter costs nothing to change, and every example below asks how the answer varies with one.
Example 1 – Beam with variable force direction
The truss in Figure 5.5.1 is held by a pin at \(A\) and by a roller at \(E\) that bears against the wall. A force of 4000 N acts at \(B\) in a direction \(\theta\) that we leave free, and a force of 200 N pushes upward at \(C\). We want to determine how all reaction forces vary as \(\theta\) changes.
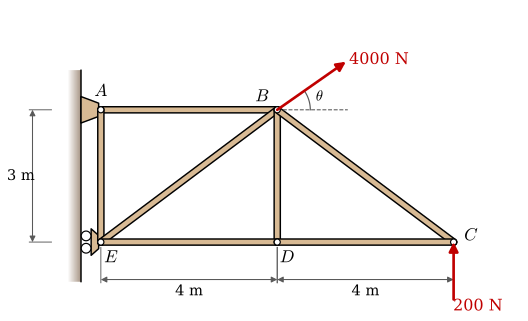
We isolate the truss and draw its free body diagram, Figure 5.5.2. The pin at \(A\) gives two reaction components, \(R_{Ax}\) and \(R_{Ay}\), and the roller at \(E\) can only push away from the wall, so it gives one horizontal component \(R_{Ex}\). The origin goes at \(A\), since taking moments about the pin removes two of the three unknowns from the moment equation.
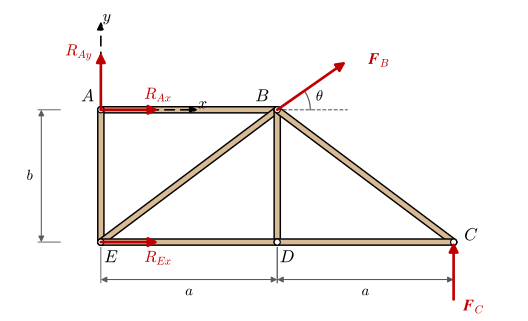
The constants are the two spans \(a = 4\) m and \(b = 3\) m and the two force magnitudes \(F_B = 4000\) N and \(F_C = 200\) N. The parameter is the angle \(\theta \in [0, 2\pi]\). With the unit direction \([\cos\theta, \sin\theta, 0]^\mathsf{T}\) for the force at \(B\), the four force vectors are
\[ \bm R_A = \begin{bmatrix} R_{Ax} \\ R_{Ay} \\ 0 \end{bmatrix}, \quad \bm R_E = \begin{bmatrix} R_{Ex} \\ 0 \\ 0 \end{bmatrix}, \quad \bm F_B = F_B \begin{bmatrix} \cos\theta \\ \sin\theta \\ 0 \end{bmatrix}, \quad \bm F_C = F_C \begin{bmatrix} 0 \\ 1 \\ 0 \end{bmatrix} \]
and the position vectors from \(A\) to the points where the other three forces act are
\[ \bm r_{AB} = a \begin{bmatrix} 1 \\ 0 \\ 0 \end{bmatrix}, \quad \bm r_{AC} = \begin{bmatrix} 2a \\ -b \\ 0 \end{bmatrix}, \quad \bm r_{AE} = b \begin{bmatrix} 0 \\ -1 \\ 0 \end{bmatrix}. \]
Three unknowns, \(R_{Ax}\), \(R_{Ay}\) and \(R_{Ex}\), need three equations. Force equilibrium gives two in the plane and moment equilibrium about \(A\) gives the third:
\[ \sum \bm F = 0: \quad \bm R_A + \bm F_B + \bm R_E + \bm F_C = \bm 0 \]
\[ \sum \bm M_A = 0: \quad \bm r_{AB} \times \bm F_B + \bm r_{AC} \times \bm F_C + \bm r_{AE} \times \bm R_E = \bm 0 \]
That is the hand work. The code below defines the same vectors, solves the two equations, and plots the solution for every \(\theta\) at once.
RR_A = sp.Matrix([R_Ax, R_Ay, 0])
FF_B = F_B * sp.Matrix([sp.cos(theta), sp.sin(theta), 0])
RR_E = sp.Matrix([R_Ex, 0, 0])
FF_C = F_C * sp.Matrix([0, 1, 0])

rr_AB = a * sp.Matrix([1, 0, 0])
rr_AC = sp.Matrix([2*a, -b, 0])
rr_AE = b * sp.Matrix([0, -1, 0])
N2 = sp.Eq(RR_A + FF_B + RR_E + FF_C, sp.Matrix([0, 0, 0]))
E2 = sp.Eq(rr_AB.cross(FF_B) + rr_AC.cross(FF_C) + rr_AE.cross(RR_E), sp.Matrix([0, 0, 0]))
sol = sp.solve([N2, E2], [R_Ax, R_Ay, R_Ex])
sol | la\[ \begin{aligned} R_{Ax} &= \dfrac{16000 \sin{\left(\theta \right)}}{3} - 4000 \cos{\left(\theta \right)} + \dfrac{1600}{3} \\[9.0pt] R_{Ay} &= - 4000 \sin{\left(\theta \right)} - 200 \\[9.0pt] R_{Ex} &= - \dfrac{16000 \sin{\left(\theta \right)}}{3} - \dfrac{1600}{3} \end{aligned} \]
Code
import matplotlib.pyplot as plt
from mechanicskit import fplot
import numpy as np

plt.style.use('seaborn-v0_8-whitegrid')
fig, ax = plt.subplots(figsize=(8, 5))
fplot(sol[R_Ax], (theta, 0, 2*sp.pi), ax=ax, label='$R_{Ax}$', color='red')
fplot(sol[R_Ay], (theta, 0, 2*sp.pi), ax=ax, label='$R_{Ay}$', color='green')
fplot(sol[R_Ex], (theta, 0, 2*sp.pi), ax=ax, label='$R_{Ex}$', color='blue')
ax.set(xlabel=r'Angle $\theta$ [rad]', ylabel='Reaction force [N]')
ax.legend()
plt.show()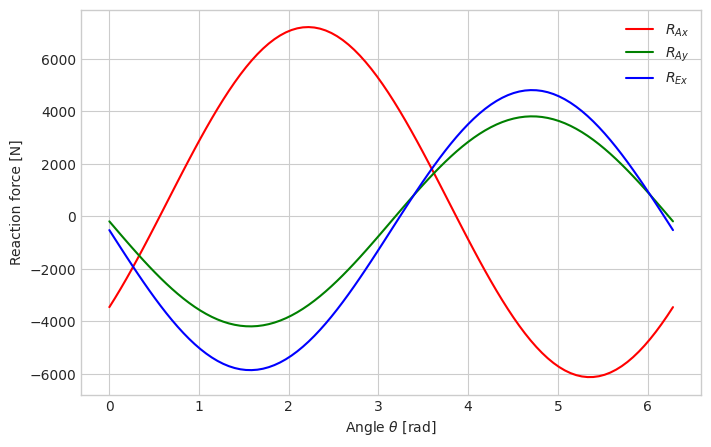
Example 2 – Beam with wire at variable position
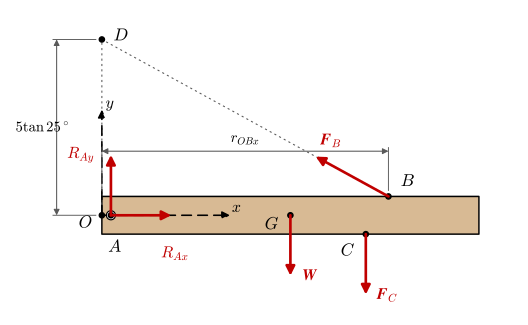
A beam with mass \(m = 475\) kg is supported at \(A\) by a pin and by a wire connected at \(B\), see Figure 5.5.3. The wire attachment point \(B\) can slide along the beam. A 10 kN force acts downward at \(C\). We want to determine the reaction forces as a function of the wire position \(r_{OBx}\).
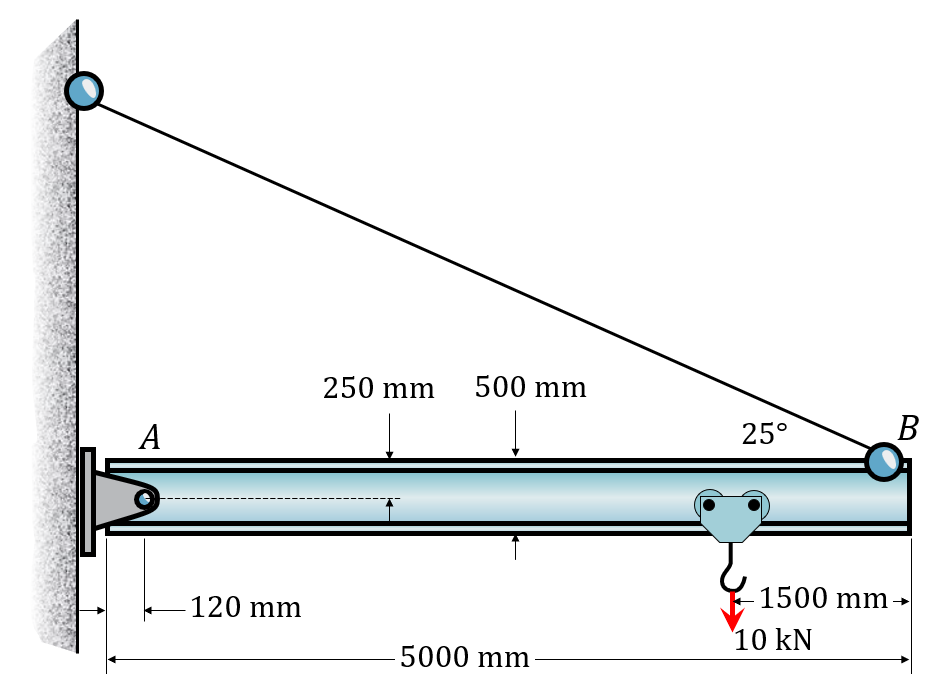
Figure 5.5.4 shows the beam on its own. The origin \(O\) is at the left end of the beam, on its centreline, and the \(x\)-axis runs along the beam. The pin at \(A\) gives \(R_{Ax}\) and \(R_{Ay}\), the weight \(\bm W\) acts at the midpoint \(G\), the load \(\bm F_C\) acts on the bottom edge at \(C\), and the wire pulls at \(B\) on the top edge toward its anchor \(D\) on the wall. The position of \(B\) along the beam is the parameter \(r_{OBx}\).
In metres, the position vectors from \(O\) are
\[ \bm r_{OA} = \begin{bmatrix} 0.12 \\ 0 \\ 0 \end{bmatrix}, \quad \bm r_{OG} = \begin{bmatrix} 2.5 \\ 0 \\ 0 \end{bmatrix}, \quad \bm r_{OC} = \begin{bmatrix} 3.5 \\ -0.25 \\ 0 \end{bmatrix}, \quad \bm r_{OB} = \begin{bmatrix} r_{OBx} \\ 0.25 \\ 0 \end{bmatrix}, \quad \bm r_{OD} = \begin{bmatrix} 0 \\ 5\tan 25^\circ \\ 0 \end{bmatrix}. \]
The anchor is where a wire leaving the far end of the beam’s centreline at \(25^\circ\) meets the wall, so its height follows from the beam length. The wire direction follows from the two points it connects, \(\bm r_{BD} = \bm r_{OD} - \bm r_{OB}\) and \(\bm e_{BD} = \bm r_{BD}/|\bm r_{BD}|\), and the wire force is a magnitude times that direction. The force vectors are
\[ \bm R_A = \begin{bmatrix} R_{Ax} \\ R_{Ay} \\ 0 \end{bmatrix}, \quad \bm W = \begin{bmatrix} 0 \\ -mg \\ 0 \end{bmatrix}, \quad \bm F_C = \begin{bmatrix} 0 \\ -10000 \\ 0 \end{bmatrix}, \quad \bm F_B = F_B\, \bm e_{BD}. \]
The unknowns are \(R_{Ax}\), \(R_{Ay}\) and \(F_B\). With moments about \(O\) the equilibrium equations are
\[ \sum \bm F = 0: \quad \bm R_A + \bm W + \bm F_C + \bm F_B = \bm 0 \]
\[ \sum \bm M_O = 0: \quad \bm r_{OA} \times \bm R_A + \bm r_{OG} \times \bm W + \bm r_{OC} \times \bm F_C + \bm r_{OB} \times \bm F_B = \bm 0 \]
The moment is taken about \(O\) and not about the pin, so \(\bm R_A\) stays in the moment equation with the short arm \(\bm r_{OA}\). The algebra is a little longer, and the code does the algebra.
g = 9.81                                                 # [m/s^2]
m = 475                                                  # [kg]

r_OBx = sp.Symbol('r_OBx', positive=True)
R_Ax, R_Ay, F_B = sp.symbols('R_Ax R_Ay F_B', real=True)

rr_OA = sp.Matrix([0.12, 0, 0])
rr_OG = sp.Matrix([2.5, 0, 0])
rr_OC = sp.Matrix([3.5, -0.25, 0])
rr_OB = sp.Matrix([r_OBx, 0.25, 0])

r_ODy = sp.tan(sp.rad(25)) * 5
rr_OD = sp.Matrix([0, r_ODy, 0])
# Wire direction from B toward D
ee_BD = (rr_OD - rr_OB).normalized()
RR_A = sp.Matrix([R_Ax, R_Ay, 0])
WW = m * g * sp.Matrix([0, -1, 0])
FF_C = sp.Matrix([0, -10000, 0])
FF_B = F_B * ee_BDsumF = sp.Eq(RR_A + WW + FF_C + FF_B, sp.Matrix([0, 0, 0]))
sumM = sp.Eq(
rr_OA.cross(RR_A) + rr_OG.cross(WW) + rr_OC.cross(FF_C) + rr_OB.cross(FF_B),
sp.Matrix([0, 0, 0])
)
sol = sp.solve([sumF, sumM], [R_Ax, R_Ay, F_B])
sol | la\[ \begin{aligned} F_{B} &= \dfrac{8978041.0 \sqrt{16.0 r_{OBx}^{2} + 69.3248264953997}}{1865.23063261999 r_{OBx} - 199.827675914399} \\[9.0pt] R_{Ax} &= \dfrac{8978041.0 r_{OBx}}{466.307658154999 r_{OBx} - 49.9569189785998} \\[9.0pt] R_{Ay} &= \dfrac{27343814.766551 r_{OBx}}{1865.23063261999 r_{OBx} - 199.827675914399} - \dfrac{77681968.2425773}{1865.23063261999 r_{OBx} - 199.827675914399} \end{aligned} \]
Code
plt.style.use('seaborn-v0_8-whitegrid')
fig, ax = plt.subplots(figsize=(8, 5))
fplot(sol[F_B],  (r_OBx, 0.5, 5), ax=ax, label='$F_B$',   color='black')
fplot(sol[R_Ax], (r_OBx, 0.5, 5), ax=ax, label='$R_{Ax}$', color='blue')
fplot(sol[R_Ay], (r_OBx, 0.5, 5), ax=ax, label='$R_{Ay}$', color='red')
ax.set(xlabel='Placement of B [m]', ylabel='Force [N]')
ax.legend()
plt.show()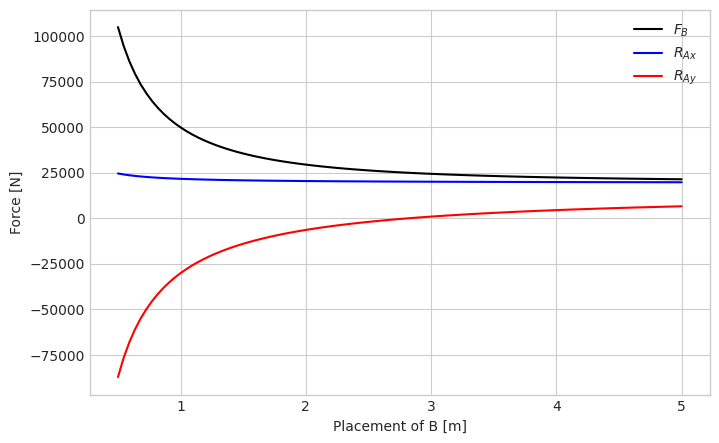
When the wire attachment approaches \(A\) the forces blow up because \(\bm F_B\)’s line of action passes through the support, making the moment arm vanish. The wire force \(F_B\) becomes negative when the line of action intersects between \(O\) and \(A\), which is not physical for a wire (wires can only pull).
Example 3 – Multi-body structure
The step frame in Figure 5.5.5 stands on the floor at \(A\), \(B\) and \(C\). Two parallel legs with rungs between them rise from \(A\) and \(B\), a single leg rises from \(C\), and the two halves are hinged together at the top at \(G\) and tied at mid-height by the bar \(DE\). A person with mass \(m = 80\) kg stands on the middle rung at \(D\).
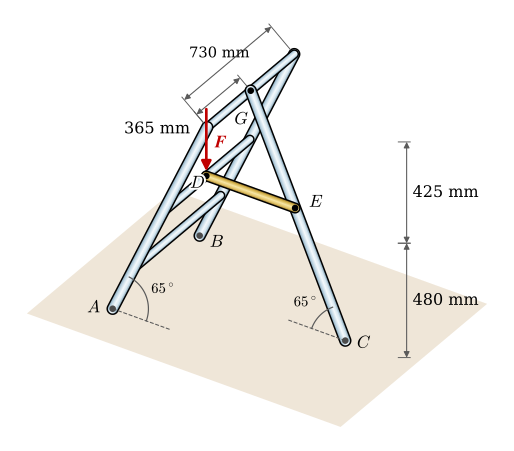
We want to determine the reaction forces at \(A\), \(B\), \(C\) and the joint forces at \(D\), \(E\), \(G\).
By symmetry, \(D\) and \(G\) are centred between \(A\) and \(B\), so the reactions at \(A\) and \(B\) are equal and the two left legs carry the same load. We can therefore reduce the frame to the plane model in Figure 5.5.6, where the two left legs act as one body and the computed reaction at \(O\) is the sum of the reactions at \(A\) and \(B\). The plane model has three bodies: body 1 is the left leg \(ODG\), body 2 is the right leg \(CEG\) and body 3 is the tie \(DE\).
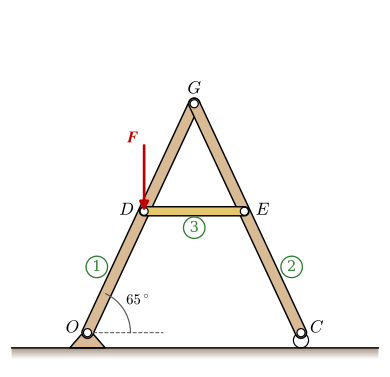
Before writing equations we must decide what type of support acts at each floor contact. The problem figure does not specify this, so we have to make a modeling choice (see Static determinacy for background). If all three supports are pins (rough surfaces), we get \(2 + 2 + 2 = 6\) reaction components from the floor but only \(3 \times 3 = 9\) equations for \(6 + 6 = 12\) unknowns (6 floor reactions + 6 joint forces at D, E, G). That is 12 unknowns and 9 equations, the system is statically indeterminate.
To make the system determinate we model \(C\) as a roller (smooth surface, only a normal force in the \(y\)-direction). Now \(O\) contributes 2 unknowns and \(C\) contributes 1, giving \(2 + 1 + 6 = 9\) unknowns and 9 equations. This is the minimum number of supports that still prevents the structure from moving, and it makes the problem solvable with equilibrium alone.
Figure 5.5.7 shows the three bodies separated. Each joint force appears twice, once on each body it connects, and Newton’s third law makes the two appearances equal and opposite: body 1 carries \(\bm R_D\) and \(\bm R_G\), body 2 carries \(-\bm R_G\) and \(\bm R_E\), and body 3 carries \(-\bm R_D\) and \(-\bm R_E\).
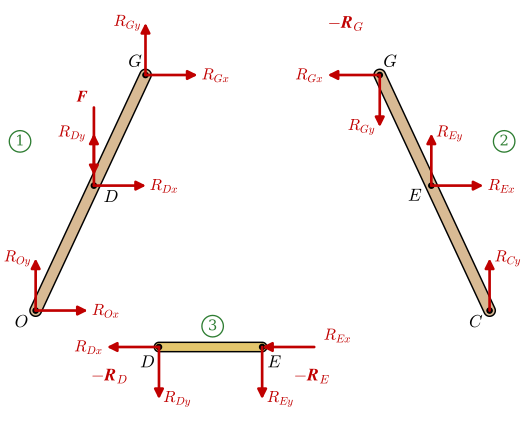
The geometry follows from the \(65^\circ\) leg angle and the two rung heights. In millimetres, with the origin at \(O\) for body 1 and at \(C\) for body 2,
\[ \bm r_{OD} = \begin{bmatrix} 480/\tan 65^\circ \\ 480 \\ 0 \end{bmatrix}, \quad \bm r_{OG} = \begin{bmatrix} 905/\tan 65^\circ \\ 905 \\ 0 \end{bmatrix}, \quad \bm r_{CE} = \begin{bmatrix} -480/\tan 65^\circ \\ 480 \\ 0 \end{bmatrix}, \quad \bm r_{CG} = \begin{bmatrix} -905/\tan 65^\circ \\ 905 \\ 0 \end{bmatrix}. \]
The tie needs the vector from \(D\) to \(E\). Going from \(O\) up to \(G\) and back down the right leg to \(E\) gives \(\bm r_{OE} = \bm r_{OG} - (\bm r_{CG} - \bm r_{CE})\), where the bracket is \(\bm r_{EG}\), and then \(\bm r_{DE} = \bm r_{OE} - \bm r_{OD}\).
The force vectors are the pin reaction at \(O\), the roller reaction at \(C\), the three joint forces and the load:
\[ \bm R_O = \begin{bmatrix} R_{Ox} \\ R_{Oy} \\ 0 \end{bmatrix}, \quad \bm R_D = \begin{bmatrix} R_{Dx} \\ R_{Dy} \\ 0 \end{bmatrix}, \quad \bm R_G = \begin{bmatrix} R_{Gx} \\ R_{Gy} \\ 0 \end{bmatrix}, \quad \bm R_E = \begin{bmatrix} R_{Ex} \\ R_{Ey} \\ 0 \end{bmatrix}, \quad \bm R_C = \begin{bmatrix} 0 \\ R_{Cy} \\ 0 \end{bmatrix}, \quad \bm F = \begin{bmatrix} 0 \\ -mg \\ 0 \end{bmatrix}. \]
Each body gives a force equation and a moment equation, taken about the point on that body that removes the most unknowns. For body 1 that point is \(O\),
\[ \sum \bm F = 0: \quad \bm R_O + \bm R_D + \bm F + \bm R_G = \bm 0 \]
\[ \sum \bm M_O = 0: \quad \bm r_{OD} \times \bm R_D + \bm r_{OD} \times \bm F + \bm r_{OG} \times \bm R_G = \bm 0 \]
for body 2 it is \(C\),
\[ \sum \bm F = 0: \quad \bm R_C + \bm R_E + (-\bm R_G) = \bm 0 \]
\[ \sum \bm M_C = 0: \quad \bm r_{CE} \times \bm R_E + \bm r_{CG} \times (-\bm R_G) = \bm 0 \]
and for body 3 it is \(D\),
\[ \sum \bm F = 0: \quad (-\bm R_D) + (-\bm R_E) = \bm 0 \]
\[ \sum \bm M_D = 0: \quad \bm r_{DE} \times (-\bm R_E) = \bm 0 \]
Nine scalar equations for nine unknowns. The code below builds the vectors and solves all of them together.
theta = sp.rad(65)
m = 80                                                   # [kg]
g = 9.82                                                 # [m/s^2]

rr_OD = sp.Matrix([480/sp.tan(theta), 480, 0])
rr_OG = sp.Matrix([905/sp.tan(theta), 905, 0])
rr_CE = sp.Matrix([-480/sp.tan(theta), 480, 0])
rr_CG = sp.Matrix([-905/sp.tan(theta), 905, 0])
rr_OE = rr_OG - (rr_CG - rr_CE)
rr_DE = rr_OE - rr_OD
R_Ox, R_Oy, R_Dx, R_Dy, R_Gx, R_Gy, R_Ex, R_Ey, R_Cy = sp.symbols(
'R_Ox R_Oy R_Dx R_Dy R_Gx R_Gy R_Ex R_Ey R_Cy', real=True)
RR_O = sp.Matrix([R_Ox, R_Oy, 0])
RR_D = sp.Matrix([R_Dx, R_Dy, 0])
RR_G = sp.Matrix([R_Gx, R_Gy, 0])
RR_E = sp.Matrix([R_Ex, R_Ey, 0])
RR_C = sp.Matrix([0, R_Cy, 0])
FF = sp.Matrix([0, -m*g, 0])# Body 1: ODG
sumF1 = sp.Eq(RR_O + RR_D + FF + RR_G, sp.Matrix([0, 0, 0]))
sumM1 = sp.Eq(rr_OD.cross(RR_D) + rr_OD.cross(FF) + rr_OG.cross(RR_G), sp.Matrix([0, 0, 0]))
# Body 2: CEG
sumF2 = sp.Eq(RR_C + RR_E + (-RR_G), sp.Matrix([0, 0, 0]))
sumM2 = sp.Eq(rr_CE.cross(RR_E) + rr_CG.cross(-RR_G), sp.Matrix([0, 0, 0]))
# Body 3: DE
sumF3 = sp.Eq((-RR_D) + (-RR_E), sp.Matrix([0, 0, 0]))
sumM3 = sp.Eq(rr_DE.cross(-RR_E), sp.Matrix([0, 0, 0]))sol = sp.solve(
[sumF1, sumM1, sumF2, sumM2, sumF3, sumM3],
[R_Ox, R_Oy, R_Dx, R_Dy, R_Gx, R_Gy, R_Ex, R_Ey, R_Cy]
)
sol | la\[ \begin{aligned} R_{Cy} &= 208.33591160221 \\[9.0pt] R_{Dx} &= 206.869437880414 \\[9.0pt] R_{Dy} &= 0.0 \\[9.0pt] R_{Ex} &= -206.869437880414 \\[9.0pt] R_{Ey} &= 0.0 \\[9.0pt] R_{Gx} &= -206.869437880414 \\[9.0pt] R_{Gy} &= 208.33591160221 \\[9.0pt] R_{Ox} &= 0.0 \\[9.0pt] R_{Oy} &= 577.26408839779 \end{aligned} \]
The reaction forces from the floor (\(R_{Oy}\) and \(R_{Cy}\)) are positive, confirming they point upward as expected. Since there is no external horizontal force we get \(R_{Ox} = 0\). The negative \(R_{Ex}\) and positive \(R_{Dx}\) tell us that body DE is in tension.
Example 4 – Tractor hoisting a bale
A tractor at \(A\) lifts a bale \(B\) through the rope-and-pulley arrangement in Figure 5.5.8. The rope runs from the tractor hitch up to a fixed pulley at the top of a post at \(C\), down around a movable pulley attached to the bale, and back up to an anchor on the post next to the pulley. The post height is \(h = 5\) m and the bale mass is \(m = 500\) kg. Initially the tractor is directly beneath the pulley (\(x_0 = 0\)) and the bale rests on the ground (\(y_0 = 0\)).
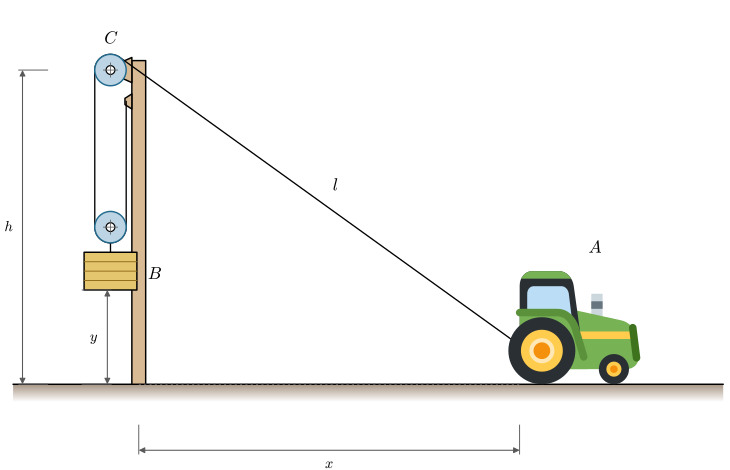
We want the distance \(\Delta x\) the tractor must travel to the right to raise the bale to \(y_1 = 4\) m, and the horizontal force the tractor must produce, treating the bale as being in quasi-static equilibrium. Both questions are answered on paper first, the first by geometry and the second by a force balance, and the code then evaluates the expressions.
The rope-length constraint ties the tractor to the bale. Three rope segments make up the total length: the inclined piece from the tractor hitch up to the fixed pulley at \(C\), and the two vertical pieces supporting the movable pulley on the bale,
\[ L(x, y) = \sqrt{x^2 + h^2} \,+\, 2\,(h - y) \]
Since the rope is inextensible \(L\) is the same at every instant of the lift, which ties the tractor’s horizontal position \(x\) to the bale’s height \(y\),
\[ \sqrt{x_0^2 + h^2} + 2(h - y_0) \;=\; \sqrt{x_1^2 + h^2} + 2(h - y_1) \]
Solving for \(x_1\) gives the tractor’s position when the bale has reached \(y_1\), and the required travel is \(\Delta x = x_1 - x_0\).
from mechanicskit import ltx, fplot
import sympy as sp

h = 5                            # [m] post height
m = 500                          # [kg] bale
g = sp.Rational(981, 100)        # [m/s^2]
x0, y0 = 0, 0                    # initial tractor and bale positions
y_1 = 4                          # [m] target bale height

L = sp.sqrt(x0**2 + h**2) + 2 * (h - y0)
ltx(r"L = \sqrt{x_0^2 + h^2} + 2 (h - y_0) =", L, r"\text{ m}")
\[ L = \sqrt{x_0^2 + h^2} + 2 (h - y_0) =15\text{ m} \]
x_1 = sp.Symbol('x_1', positive=True)
eq = sp.Eq(sp.sqrt(x_1**2 + h**2) + 2 * (h - y_1), L)
eq
\(\displaystyle \sqrt{x_{1}^{2} + 25} + 2 = 15\)
x_1_val = sp.solve(eq, x_1)[0]
dx = x_1_val - x0

ltx(r"L =", L, r"\text{ m},\quad x_1 =", x_1_val, r"\text{ m},\quad \Delta x =", dx, r"\text{ m}")
\[ L =15\text{ m},\quad x_1 =12\text{ m},\quad \Delta x =12\text{ m} \]
For the force the tractor needs, we balance the forces on the bale and then on the hitch. The movable pulley distributes the bale’s weight between two rope segments, both carrying the same tension \(T\). Treating the bale as a particle in equilibrium,
\[ 2 T - m g = 0 \quad \Rightarrow \quad T = \frac{m g}{2} \]
Tension is constant along the whole rope, so the tractor hitch feels the same \(T\) directed up toward the pulley at \(C\). At tractor position \(x\) this direction makes angle \(\theta\) with the horizontal, \(\tan\theta = h/x\), and only the horizontal component has to be produced at the drive wheels,
\[ F(x) = T \cos\theta = \frac{m g}{2}\,\frac{x}{\sqrt{x^2 + h^2}} \]
The vertical component \(T\sin\theta\) lifts the hitch and is borne by the tractor’s own weight.
x = sp.Symbol('x', positive=True)
T = sp.Rational(m) * g / 2
F = T * x / sp.sqrt(x**2 + h**2)

F_1 = F.subs(x, x_1_val)

ltx(r"T =", T, r"\text{ N},\qquad F(x_1) =", F_1.evalf(5), r"\text{ N}")
\[ T =\dfrac{4905}{2}\text{ N},\qquad F(x_1) =2263.8\text{ N} \]
Code
from matplotlib import pyplot as plt
fig, ax = plt.subplots(figsize=(7, 4))
fplot(F, (x, 0, 15), ax=ax, label=r'$F(x)$', color='tab:blue')
ax.axvline(float(x_1_val), color='k', linestyle='--', alpha=0.4,
           label=fr'$x_1 = {float(x_1_val):.0f}$ m')
ax.axhline(float(F_1), color='k', linestyle=':', alpha=0.4)
ax.set(xlabel=r'Tractor position $x$ [m]', ylabel=r'Tractor force $F$ [N]')
ax.legend(); plt.show()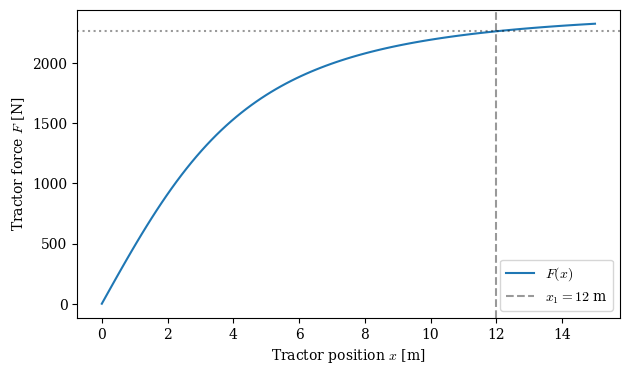
At the start, with the tractor directly beneath the pulley, the rope hangs vertically and the horizontal pull is zero even though the hitch already carries the full tension \(T = mg/2\) upward. As the tractor rolls away from the post the rope flattens, its horizontal component grows, and the tractor must produce its largest force at the end of the lift. The movable pulley halves the rope tension, so the tractor never has to pull with more than \(\tfrac{1}{2} m g x_1/\sqrt{x_1^2+h^2}\).
Example 5 – Bar held by a spring
The bar \(CB\) in Figure 5.5.9 has mass \(m\) and length \(l\). It is pinned to the wall at \(C\) and held up by a spring of stiffness \(k\) that runs from its free end \(B\) to a pin \(A\) on the wall, a height \(h\) above \(C\). A force \(P\) hangs from \(B\), and the angle \(\theta\) is measured from the upward vertical to the bar. We want two things: the stiffness \(k\) that holds the bar horizontal for a given load \(P\), and, with \(k\) known, the load \(P\) that holds the bar at an arbitrary angle \(\theta\).
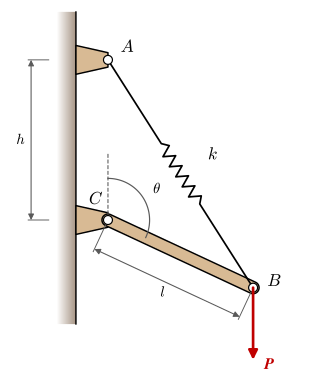
The spring force is proportional to the stretch, \(F_s = k(s - L_0)\), where \(s\) is the current length of the spring and \(L_0\) its unstretched length. The problem does not give \(L_0\), so we carry it as a parameter. Its value decides how the answer behaves.
Figure 5.5.10 shows the bar on its own. The pin at \(C\) gives \(R_{Cx}\) and \(R_{Cy}\), the weight \(\bm W\) acts at the midpoint \(G\), the load \(\bm P\) acts at \(B\), and the spring pulls \(B\) toward \(A\). The origin goes at \(C\), where the moment equation loses both pin components.
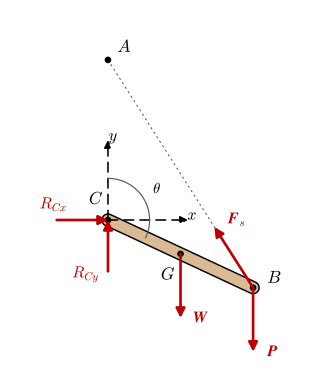
The position vectors from \(C\) are
\[ \bm r_{CA} = \begin{bmatrix} 0 \\ h \\ 0 \end{bmatrix}, \quad \bm r_{CB} = l \begin{bmatrix} \sin\theta \\ \cos\theta \\ 0 \end{bmatrix}, \quad \bm r_{CG} = \tfrac{1}{2}\bm r_{CB}. \]
The spring runs along \(\bm r_{BA} = \bm r_{CA} - \bm r_{CB}\), so its current length is
\[ s = |\bm r_{BA}| = \sqrt{h^2 + l^2 - 2hl\cos\theta} \]
and the spring force is the stretch times the stiffness in the direction \(\bm r_{BA}/s\). The four force vectors are
\[ \bm R_C = \begin{bmatrix} R_{Cx} \\ R_{Cy} \\ 0 \end{bmatrix}, \quad \bm F_s = k\,(s - L_0)\,\frac{\bm r_{BA}}{s}, \quad \bm W = \begin{bmatrix} 0 \\ -mg \\ 0 \end{bmatrix}, \quad \bm P = \begin{bmatrix} 0 \\ -P \\ 0 \end{bmatrix}. \]
Equilibrium of the bar requires
\[ \begin{aligned} \sum \bm F &= \bm R_C + \bm F_s + \bm W + \bm P = \bm 0 \\ \sum \bm M_C &= \bm r_{CB} \times \bm F_s + \bm r_{CG} \times \bm W + \bm r_{CB} \times \bm P = \bm 0 \end{aligned} \]
The two vector equations contain three nonzero scalar equations, the \(x\)- and \(y\)-components of \(\sum \bm F\) and the \(z\)-component of \(\sum \bm M_C\), so they determine three unknowns. The two parts of the problem differ only in which three. For the horizontal bar we set \(\theta = \pi/2\) and solve for \(R_{Cx}\), \(R_{Cy}\) and the stiffness \(k\). In the second part \(k\) is known and \(\theta\) stays free, and we solve for \(R_{Cx}\), \(R_{Cy}\) and the load \(P\) as functions of the angle.
m, P, h, l, k, g = sp.symbols('m P h l k g', positive=True)
L_0 = sp.Symbol('L_0', nonnegative=True)                  # [m] unstretched spring length
theta = sp.Symbol('theta', real=True)
R_Cx, R_Cy = sp.symbols('R_Cx R_Cy', real=True)

rr_CA = sp.Matrix([0, h, 0])
rr_CB = l * sp.Matrix([sp.sin(theta), sp.cos(theta), 0])
rr_CG = rr_CB / 2
rr_BA = rr_CA - rr_CB
s = sp.sqrt(h**2 + l**2 - 2*h*l*sp.cos(theta))           # current spring length

RR_C = sp.Matrix([R_Cx, R_Cy, 0])
FF_s = k * (s - L_0) * rr_BA / s                         # stretch times stiffness, along BA
WW   = sp.Matrix([0, -m*g, 0])
PP   = sp.Matrix([0, -P, 0])
sumF = sp.Eq(RR_C + FF_s + WW + PP, sp.Matrix([0, 0, 0]))
sumM = sp.Eq(rr_CB.cross(FF_s) + rr_CG.cross(WW) + rr_CB.cross(PP), sp.Matrix([0, 0, 0]))
# Part A: the bar horizontal, the stiffness unknown
sol_A = sp.solve([sumF.subs(theta, sp.pi/2), sumM.subs(theta, sp.pi/2)],
[R_Cx, R_Cy, k], dict=True)[0]
{key: sp.simplify(val) for key, val in sol_A.items()} | la\[ \begin{aligned} R_{Cx} &= \dfrac{l \left(2 P + g m\right)}{2 h} \\[9.0pt] R_{Cy} &= \dfrac{g m}{2} \\[9.0pt] k &= \dfrac{\left(- P - \dfrac{g m}{2}\right) \sqrt{h^{2} + l^{2}}}{h \left(L_{0} - \sqrt{h^{2} + l^{2}}\right)} \end{aligned} \]
At \(\theta = \pi/2\) the pin carries half the weight vertically, \(R_{Cy} = mg/2\), and pushes the bar away from the wall with \(R_{Cx} = (P + mg/2)\,l/h\), the horizontal pull of the spring.
For the second part we keep \(\theta\) free and solve the same two equations for \(P\) and the pin components, then insert \(h = l = 1\) m, \(m = 1\) kg, \(k = 10\) N/m and \(g = 9.81\) m/s\(^2\).
# Part B: the stiffness known, the load unknown
sol_B = sp.solve([sumF, sumM], [R_Cx, R_Cy, P], dict=True)[0]
P_theta = sol_B[P].subs({h: 1, l: 1, m: 1, k: 10, g: sp.Rational(981, 100)})
P_theta | la
\[ {\def\arraystretch{1.0}- \dfrac{10 L_{0}}{\sqrt{2 - 2 \cos{\left(\theta \right)}}} + \dfrac{1019}{200}} \]
Code
plt.style.use('seaborn-v0_8-whitegrid')
fig, ax = plt.subplots(figsize=(8, 5))
P_num = sp.lambdify((theta, L_0), P_theta)
th = np.linspace(0.2, np.pi, 300)
for L0_val, color in ((0, 'black'), (0.5, 'blue'), (1, 'red')):
    # broadcast, since for L_0 = 0 the load is a single number
    ax.plot(th, np.broadcast_to(P_num(th, L0_val), th.shape),
            label=f'$L_0 = {L0_val:g}$ m', color=color)
ax.axvline(np.pi/2, color='k', linestyle='--', alpha=0.4)
ax.set(xlabel=r'Angle $\theta$ [rad]', ylabel='Load $P$ [N]', ylim=(-20, 10))
ax.legend()
plt.show()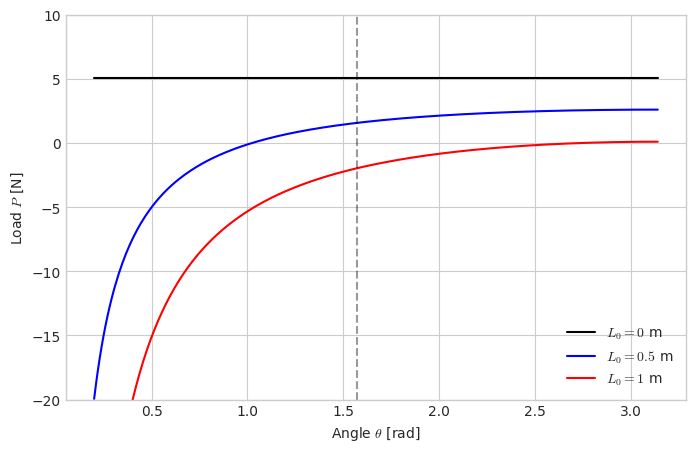
The curve for \(L_0 = 0\) is flat. In the solution above the angle enters only through the term with \(L_0/\sqrt{2 - 2\cos\theta}\), the unstretched length divided by the spring length \(s\), and with \(L_0 = 0\) that term vanishes. A spring with zero unstretched length pulls with a force proportional to its length \(s\), while the lever arm of that force about \(C\) is inversely proportional to \(s\), so its moment grows with \(\sin\theta\) exactly as the moments of the load and the weight do. The load \(P = kh - mg/2 = 5.1\) N then holds the bar at every angle, so the stiffness from the first part does not select the horizontal position at all: it makes the bar balance anywhere. This is the principle behind a spring-balanced desk lamp, which stays wherever we leave it. A real spring has \(L_0 > 0\), pulls less when short, and the load must fall as the bar swings up toward \(A\). Below the angle where the curve crosses zero, \(P\) turns negative and would have to lift \(B\) to hold it.
At \(\theta = 0\) and \(\theta = \pi\) the bar lies on the vertical line through \(C\), every force passes through the pin, and the moment equation holds for any load. The curves show the limit as the bar approaches these positions.