10.7 VS Code, PlatformIO and the ESP32
This chapter gets an ESP32 development board blinking an LED from VS Code. Every embedded project in this part of the book is built the same way, so the setup we make here is the one we use from now on. The guide comes first: follow the steps in order. The explanation of why the project looks the way it does comes after the guide.
One rule shapes the whole setup. Everything that describes a project lives in its platformio.ini file: which board it runs on, which version of the ESP32 software it is built with, which libraries it needs, how fast the serial port talks, and which pin the LED is on. Nothing is set in a global menu of the editor, and nothing is installed by hand. A project folder copied to another computer, or opened again a year later, therefore builds and behaves exactly as it did the day it was made.
The blink program below runs in the browser in Wokwi, a simulator for the ESP32. It is a good way to read the code before the hardware arrives, but it does not replace the steps below.
The Guide
Step 1: Install VS Code and PlatformIO
On Windows, the one-line installer from Installing Python and Setup installs VS Code. On macOS and Linux, download VS Code from code.visualstudio.com.
Open VS Code, press Ctrl+Shift+X to open the Extensions panel, search for PlatformIO IDE and click Install. The extension installs PlatformIO Core, the program that does the actual building and uploading, in the background. This takes a few minutes the first time. Restart VS Code when it asks you to. An alien head icon appears in the left sidebar when the installation is done.
Step 2: Connect the board
Connect the ESP32 board to the computer with a USB-C cable. The cable must carry data: many cables sold with phones and power banks only charge, and with one of those the computer never sees the board.
On Windows, press Win+X and open Device Manager. Under Ports (COM & LPT) the board appears as a USB serial device with a COM number, e.g. USB-SERIAL CH340 (COM5) or Silicon Labs CP210x USB to UART Bridge (COM5). If it appears instead under Other devices with a yellow warning sign, Windows lacks the driver for the USB chip on the board. Install the driver for the chip named there, either CH340 or CP210x, and plug the board in again.
On macOS the board appears as /dev/cu.usbserial-... or /dev/cu.wchusbserial... without extra drivers. On Linux, install the PlatformIO udev rules once, so that a normal user may open the serial port.
Step 3: Create the project
Click the alien head, then Create New Project (under Quick Access, or PIO Home → New Project). Fill in:
- Name:
blink - Board:
Espressif ESP32 Dev Module - Framework:
Arduino
Click Finish. PlatformIO creates the folder blink and opens it. The first project takes a while because PlatformIO downloads the ESP32 platform in the background.
Step 4: Replace platformio.ini
Open platformio.ini in the project folder, delete everything in it and paste:
[env:esp32dev]
platform = espressif32@6.13.0
board = esp32dev
framework = arduino

upload_speed = 921600
monitor_speed = 115200
monitor_echo = yes
monitor_filters = send_on_enter, esp32_exception_decoder

build_flags =
    -D LED_PIN=2
    -D LED_ON=HIGH
    -D BLINK_MS=500
    -D BAUD=${this.monitor_speed}
Save the file. PlatformIO notices the change and prepares the project again, which the first time downloads the exact platform version named on the platform line.
Step 5: Write the program
Open src/main.cpp, delete everything in it and paste:
#include <Arduino.h>

// LED_PIN, LED_ON, BLINK_MS and BAUD come from build_flags in platformio.ini
#if !defined(LED_PIN) || !defined(LED_ON) || !defined(BLINK_MS) || !defined(BAUD)
#error "Set LED_PIN, LED_ON, BLINK_MS and BAUD under build_flags in platformio.ini"
#endif

void setup() {
  Serial.begin(BAUD);
  pinMode(LED_PIN, OUTPUT);
  Serial.printf("Blinking GPIO %d every %d ms\n", LED_PIN, BLINK_MS);
}

void loop() {
  digitalWrite(LED_PIN, LED_ON);
  Serial.println("on");
  delay(BLINK_MS);

  digitalWrite(LED_PIN, !LED_ON);
  Serial.println("off");
  delay(BLINK_MS);
}
The program contains no numbers of its own. The pin, the blink period and the baud rate are names, and their values come from platformio.ini.
Step 6: Build, upload and monitor
The PlatformIO toolbar is in the blue status bar at the bottom of the VS Code window. Its three buttons we use all the time are:
| Button | Action | What it does |
|---|---|---|
| ✓ | Build | Compiles the program. Nothing is sent to the board. |
| → | Upload | Builds if needed, then writes the program to the board. |
| plug | Serial Monitor | Opens a terminal that shows what the board prints. |
Click Build. The first build downloads the compiler and the Arduino framework for the ESP32, a few hundred megabytes, and takes several minutes. It ends with SUCCESS. Later builds take seconds, because only changed files are compiled again.
Click Upload. When the terminal shows Connecting...., press and hold the BOOT button on the board, and release it when the percentages of Writing at 0x... start counting.
The ESP32 boards in our kits lack the small circuit that puts the chip in upload mode by itself, so every upload needs the BOOT button held while the computer connects. If you miss the moment, the upload fails after a few seconds with Failed to connect to ESP32. Click Upload again and hold BOOT earlier. Why the button is needed is explained below. Boards that have the circuit upload without the button.
After the upload the board restarts and the LED marked D2 on the board blinks once per second. Click Serial Monitor to see the board talk:
Blinking GPIO 2 every 500 ms
on
off
on
off
The first line is printed only once, at start-up, and often before the monitor has opened. Press the EN button on the board to restart the program and see it.
Step 7: Check that you own the setup
Change BLINK_MS to 100 in platformio.ini, upload again and watch the LED blink five times faster. Nothing in main.cpp changed. If that worked, the setup is complete.
Troubleshooting
No COM port appears, or Upload says it cannot find a serial port
The computer does not see the board. Try another cable first, since a charge-only cable is the most common cause, then another USB port. Check Device Manager as in Step 2 and install the driver if the board shows up under Other devices.
Failed to connect to ESP32: Wrong boot mode detected or Timed out waiting for packet header
The board was not in upload mode when the computer tried to connect. Hold BOOT while Connecting.... is shown, as described in Step 6.
could not open port 'COM5': PermissionError or Access is denied
Another program has the serial port open. Close every other serial monitor, such as a second VS Code window, the Arduino IDE or CoolTerm, and upload again.
#error "Set LED_PIN, LED_ON, BLINK_MS and BAUD ..."
One of the names is missing from build_flags in platformio.ini. Compare the file with Step 4. Each -D line must be indented under build_flags =.
The serial monitor shows garbage characters
The monitor and the program use different baud rates. With the platformio.ini above this cannot happen, because both read the same value; it happens when Serial.begin() is given a number by hand.
The build fails after an extension update
Delete the hidden .pio folder in the project and build again. It holds only downloaded and generated files, and PlatformIO recreates it.
How the Setup Works
The guide above tells us what to do. This section explains why.
Why PlatformIO
The Arduino IDE is the classic way to program boards like the ESP32. It keeps the board selection, the library versions and the port speed in global settings of the editor, outside the project folder. Two students with the same sketch can therefore build two different programs, and a sketch that built last spring may not build this autumn because a library was updated in between. PlatformIO moves all of this into one text file inside the project, and it runs inside VS Code, which we already use for Python. The editor brings autocompletion, Git and an integrated terminal with it.
The project folder
PlatformIO creates this structure:
blink/
├── platformio.ini   the project description
├── src/
│   └── main.cpp     the program
├── include/         header files (.h) of our own
├── lib/             libraries of our own
├── test/            unit tests
└── .pio/            downloads and build output, never edit or commit
Only platformio.ini, src/ and the folders we put files in are part of the project. The .pio folder is rebuilt from platformio.ini whenever it is missing, which is why it is excluded from Git and why deleting it is a safe repair.
platformio.ini line by line
The file is divided into sections in square brackets. [env:esp32dev] defines an environment called esp32dev: one complete recipe for building the project for one board. The name is ours to choose; we name it after the board.
platform = espressif32@6.13.0 selects the package that knows how to build for Espressif chips, and pins its version. Each platform version brings a specific version of the Arduino framework for the ESP32; 6.13.0 brings Arduino-ESP32 2.0.17. Without the @6.13.0, PlatformIO takes whatever version is newest on the day the project is first built. That matters more than it sounds: version 3 of the Arduino framework renamed the PWM functions we use for motor control (ledcSetup and ledcAttachPin became ledcAttach), so a project written for version 2 stops compiling under version 3. With the version pinned, the code in this book builds the way it is printed. Moving to a newer version is then a deliberate change of one line, made when we are ready to fix what it breaks.
board = esp32dev tells PlatformIO which chip, flash size and pin layout to build for. esp32dev describes the common ESP32 development board with an ESP-WROOM-32 module; the full list is in the board registry. framework = arduino selects the Arduino functions (pinMode, digitalWrite, delay, Serial) over Espressif’s own lower-level framework.
upload_speed = 921600 is the baud rate used while writing the program to the board. The default is 460800; doubling it halves the upload time. If uploads fail half-way with a long cable, lowering this number is the first thing to try.
The four monitor_ lines configure the serial monitor. monitor_speed = 115200 is the baud rate it listens at, and it must equal the rate the program passes to Serial.begin(). monitor_echo = yes shows what we type, which the monitor otherwise sends without showing. monitor_filters lists processing steps for the text: send_on_enter collects what we type and sends the whole line when we press Enter, which is what a program reading commands with Serial.readStringUntil('\n') expects, and esp32_exception_decoder translates the addresses in a crash report into file names and line numbers. Blink reads no input, but the labs that follow do, so every project in this book starts with the same four lines.
Settings as build flags
build_flags passes options to the compiler. An option of the form -D NAME=value defines NAME as if #define NAME value stood at the top of every source file. This is how the LED pin, its active level and the blink period reach main.cpp. The #error guard at the top of the program stops the build with a readable message if one of them is missing, which is far easier to act on than the error a compiler gives for an unknown name.
The last flag, -D BAUD=${this.monitor_speed}, uses PlatformIO’s variable substitution: ${this.monitor_speed} is replaced by the value of monitor_speed in the same environment, here 115200. The baud rate is therefore written once, and the program and the monitor cannot disagree about it. The resolved values can be checked in a terminal with
pio project configwhich prints every option of every environment as PlatformIO reads it.
Note that LED_ON is a value and not a pin. On this board the LED lights when the pin is driven HIGH. On many other boards it lights when the pin is driven LOW, because it is wired between the supply and the pin. Writing digitalWrite(LED_PIN, LED_ON) and digitalWrite(LED_PIN, !LED_ON) keeps that detail out of the program as well.
Libraries
Libraries are declared in the same file, under lib_deps, by owner, name and version. The magnetic angle sensor used later in the course is read with Rob Tillaart’s AS5600 library:
lib_deps =
    robtillaart/AS5600@^0.6.1
PlatformIO downloads the library into .pio on the next build. The ^ accepts later bug-fix releases such as 0.6.4, but not 0.7, which is allowed to change how the library is used. Libraries are found in the PlatformIO registry, where each library page shows the exact line to paste.
Why the BOOT button
When the ESP32 comes out of reset it reads the level of GPIO 0. If the pin is high, the chip runs the program in its flash memory. If the pin is low, it starts a small loader in its read-only memory that waits for a new program over the serial port. The BOOT button connects GPIO 0 to ground, and the EN button resets the chip.
Most development boards have two transistors that let the USB chip pull GPIO 0 low and reset the ESP32 through the control lines of the serial port, so the uploader can enter upload mode by itself. The boards in our kits lack these transistors. Holding BOOT while the uploader sends its reset does by hand what the transistors would do. Once the transfer has started, the chip stays in upload mode until it is reset, so the button can be released.
GPIO 0 is also the reason the pin tables in the coming chapters mark it, together with GPIO 2, 5, 12 and 15, as a pin to use with care. These strapping pins are read at reset, and a circuit that pulls one of them the wrong way prevents the board from starting or from accepting an upload.
Several boards in one project
An environment describes one board, and a project may have several. The course also uses the Seeed Studio XIAO ESP32-S3, a much smaller board with an ESP32-S3 chip (Figure 10.7.1). Its LED is on GPIO 21 and lights when the pin is LOW. The same main.cpp runs on both boards with this platformio.ini:
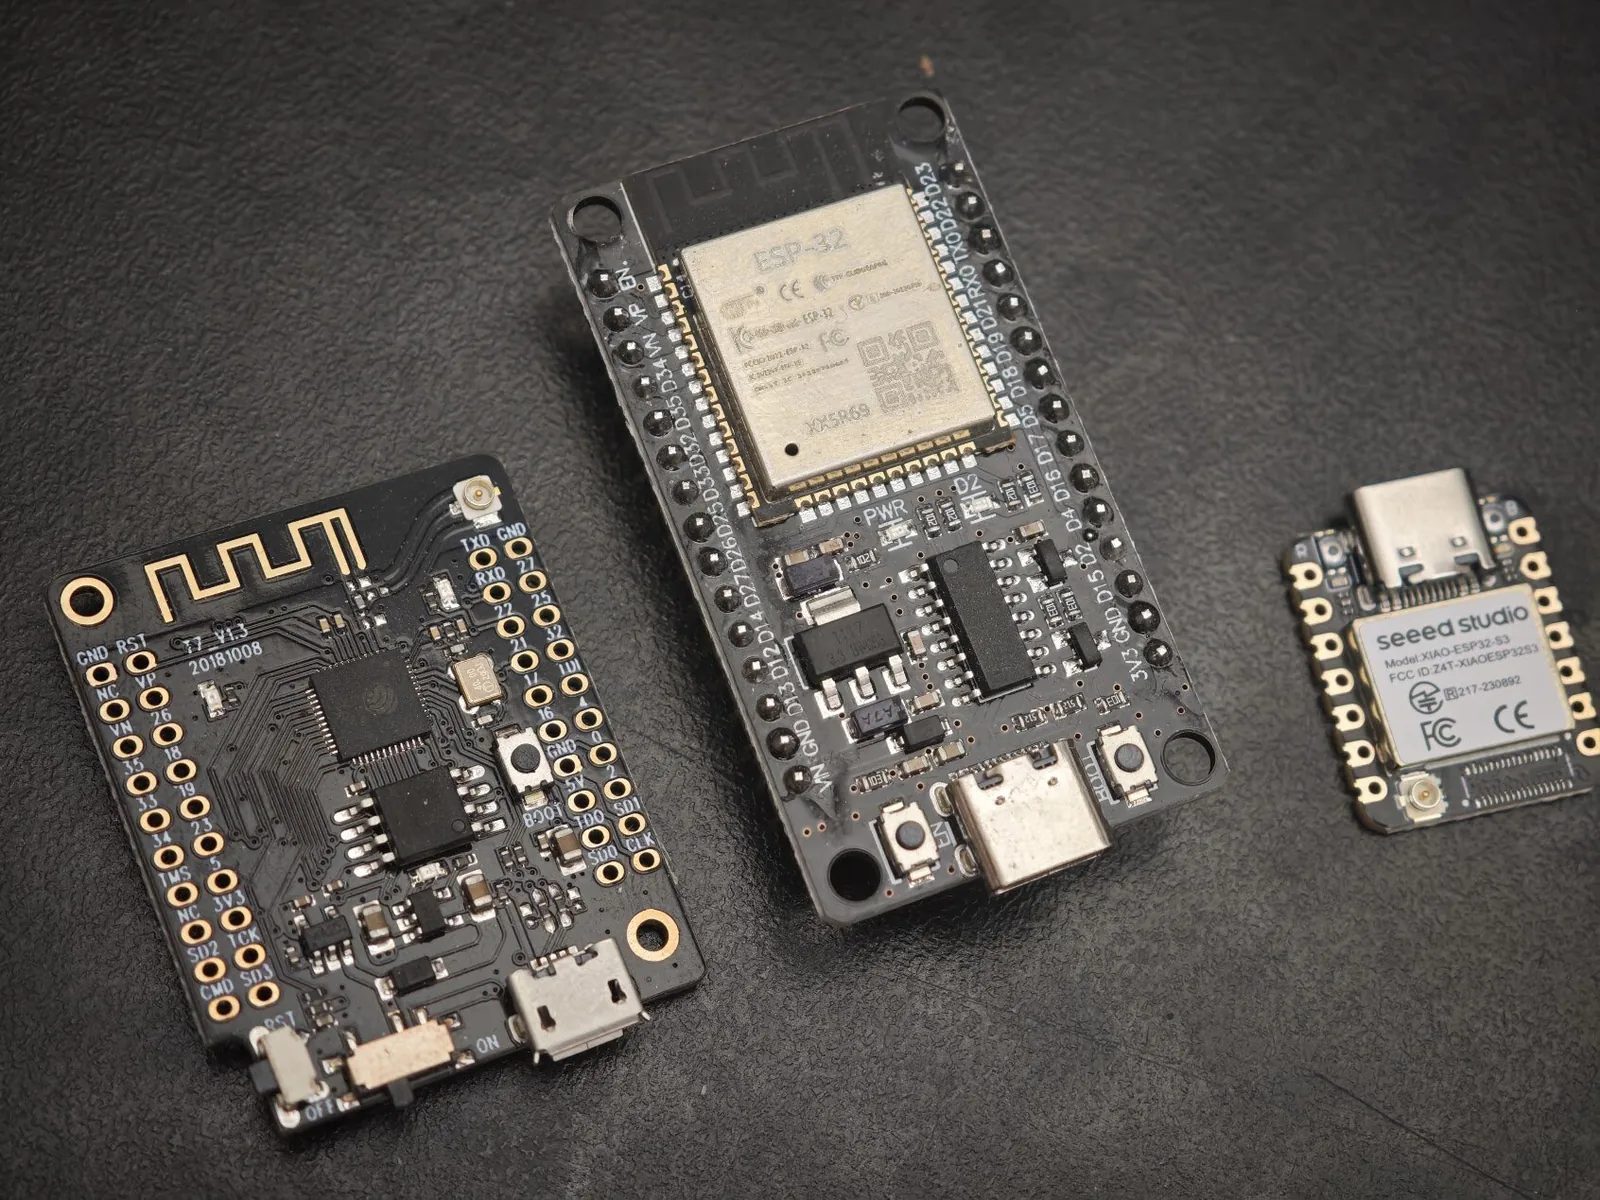
EN and BOOT buttons beside the connector and the AMS1117 regulator above it. Right: the Seeed Studio XIAO ESP32-S3.
[platformio]
default_envs = esp32dev

[env]
platform = espressif32@6.13.0
framework = arduino
monitor_speed = 115200
monitor_echo = yes
monitor_filters = send_on_enter, esp32_exception_decoder

[env:esp32dev]
board = esp32dev
upload_speed = 921600
build_flags =
    -D LED_PIN=2
    -D LED_ON=HIGH
    -D BLINK_MS=500
    -D BAUD=${this.monitor_speed}

[env:xiao_esp32s3]
board = seeed_xiao_esp32s3
build_flags =
    -D LED_PIN=21
    -D LED_ON=LOW
    -D BLINK_MS=500
    -D BAUD=${this.monitor_speed}
The plain [env] section holds what the environments share, and each [env:...] section adds what is particular to its board. default_envs decides which environment the toolbar buttons build. To switch, click the environment name in the status bar, or select it at the top of the PlatformIO sidebar.
The XIAO connects its USB port directly to the ESP32-S3, which has USB built in, so it needs no USB chip, no driver and no BOOT button for a normal upload. If a program crashes so early that the board no longer shows up as a port, hold BOOT while plugging the cable in; the board then starts in upload mode and accepts a new program.
The same steps from a terminal
The toolbar buttons run PlatformIO Core commands, and the same commands work in the VS Code terminal (Ctrl+ö on Nordic keyboards). Run them in the project folder:
pio run                                # build the default environment
pio run -t upload                      # build and upload
pio device monitor                     # open the serial monitor
pio run -e xiao_esp32s3 -t upload      # build and upload another environment
On Windows, the pio command is found when the terminal is opened from the PlatformIO sidebar (Quick Access → Miscellaneous → PlatformIO Core CLI).